One of these days I was testing one of my
Hyper-Vs and because of a mistake of mine I removed all the VM associations to Hyper-V mmc console and SCVMM…
Now what!!!! I knew that the supported way to add those machines back to the Hyper-V and SCVMM was through backup/Restore or I could import them using an “previous” export, but those machines were new VMs created only for the test propose, I had no backup or export of them.
How to import them back? Ok, no panic, first thing to check is the files, are the VM files still in place? Yes!!! Ok, that means not all is lost…
Note: The GUIDs mentioned here belong to my virtual machine, in your network the GUIDs will differ.
How to recover Hyper-V Virtual Machine manually (unsupported ways...)
1 Option:
Easy enough, you create a new VM choose the option “attach a virtual hard disk latter” or “Use an existing virtual hard disk” and then map the VM to the disk used before by the other “missing” VM, of course, you can copy the disk to the new VM folder to keep all files together.
Nah….. I need the VM configuration, those configurations were critical to my tests and I don’t have the configuration paper with me.
Let's try Option 2
**************************************************************
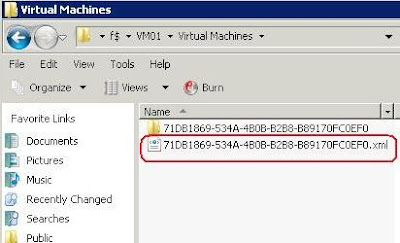
2 Option:First go to the “missing VM folder\virtual Machines\” and take note of the file {GUID}.xml (In this scenario is the
71DB1869-534A-4B0B-B2B8-B89170FC0EF0.xml).
Now open the Hyper-V mmc and create a new VM with the same name, and point the new VM to the same drive/folder where the “missing VM” is at.
Choose the option “attach a virtual hard disk latter” and do a next, next, thing until you finish the VM creation process.
Now go to the VM folder and under “Virtual Machines” folder you have 2 GUIds.xml, the original 71DB1869-534A-4B0B-B2B8-B89170FC0EF0.xml (that you take note in the first step) and the new (in this scenario) E5D8FBFC-4E01-4D48-AE95-1CF1630E2C24.xml that refers to the new VM (Note: The GUIDs that you have, will differ from these).
The next step is to copy everything that is inside of the old 71DB1869-534A-4B0B-B2B8-B89170FC0EF0.xml to the new E5D8FBFC-4E01-4D48-AE95-1CF1630E2C24.xml, yes, everything… Basically you’re replacing the contents of the new {GUID}.xml with data from the old one. Save the file with the same name in the same place replacing the existing one.
Next step, open the E5D8FBFC-4E01-4D48-AE95-1CF1630E2C24.xml, and the replace everything that has the 71DB1869-534A-4B0B-B2B8-B89170FC0EF0 with E5D8FBFC-4E01-4D48-AE95-1CF1630E2C24. Save the file replacing the existing one.
Next step, copy the files that are inside the “F:\VM01\Virtual Machines\71DB1869-534A-4B0B-B2B8-B89170FC0EF0” to “F:\VM01\Virtual Machines\E5D8FBFC-4E01-4D48-AE95-1CF1630E2C24”, you must also rename the files (.bin and .vsv) that are inside that folder to match the new GUID.
If you have snapshots, then you also need to rename some files and folders inside Snapshots folder. Open “VM01\Snapshots” folder. Rename the folder “VM01\Snapshots \71DB1869-534A-4B0B-B2B8-B89170FC0EF0” to “VM01\Snapshots\E5D8FBFC-4E01-4D48-AE95-1CF1630E2C24”. Then open the “VM01\Snapshots\{GUIDofTheSnapshot}” and rename the files inside that folder (.bin and .vsv) to match the GUID of the new VM (If you have multiple snapshots, you have to repeat the same process to each one).
Now, open “VM01\Snapshots\{GUIDofTheSnapshot}.xml” and replace the values with “71DB1869-534A-4B0B-B2B8-B89170FC0EF0” with the new VM GUID “E5D8FBFC-4E01-4D48-AE95-1CF1630E2C24”.
(If you have multiple snapshots, you have to repeat the same process to each one).
Now is time to allow access to the Service SID access to all files in VM01, from cmdline type:
Icacls F:\VM01\ /T /grant "NT VIRTUAL MACHINE\E5D8FBFC-4E01-4D48-AE95-1CF1630E2C24":(F)
The last step is to manually create a symbolic link and grant the proper permissions to each individual snapshot that has a {GUID}.xml inside the VM01\snapshots folder (in this case there’re 2 snapshots).
Mklink "C:\ProgramData\Microsoft\Windows\Hyper-V\Snapshots\324E6E76-77EC-4671-9E25-3D4B5D3133BA.xml" "F:\VM01\Snapshots\324E6E76-77EC-4671-9E25-3D4B5D3133BA.xml"
Mklink "C:\ProgramData\Microsoft\Windows\Hyper-V\Snapshots\D6EC4773-75A6-49E7-84D2-3B619D1D450C.xml" "F:\VM01\Snapshots\D6EC4773-75A6-49E7-84D2-3B619D1D450C.xml"
Now give access permissions to the new VM Service SID access.
Icacls C:\ProgramData\Microsoft\Windows\Hyper-V\Snapshots\324E6E76-77EC-4671-9E25-3D4B5D3133BA.xml /grant "NT VIRTUAL MACHINE\E5D8FBFC-4E01-4D48-AE95-1CF1630E2C24":(F) /L
Icacls C:\ProgramData\Microsoft\Windows\Hyper-V\Snapshots\D6EC4773-75A6-49E7-84D2-3B619D1D450C.xml /grant "NT VIRTUAL MACHINE\E5D8FBFC-4E01-4D48-AE95-1CF1630E2C24":(F) /L
Go to the settings of the VM01 and assign the proper Network switch.
Start VM01 and you’re DONE!!!!
Are you NUTS!!!! That’s too much work for a VM recovery!!!! And if I had 20 VMs to recover, that process will take the entire month…
**************************************************************
Option3:
This method is simpler, we’ll re-assign the “missing” Symbolic links and give permissions to the Service SID.
Using Mklink, create the Symbolic link under "C:\ProgramData\Microsoft\Windows\Hyper-V\Virtual Machines"
Mklink "C:\ProgramData\Microsoft\Windows\Hyper-V\Virtual Machines\71DB1869-534A-4B0B-B2B8-B89170FC0EF0.xml" "F:\VM01\Virtual Machines\71DB1869-534A-4B0B-B2B8-B89170FC0EF0.xml"
Now give access permissions to the service SID to this Symbolic link.
Icacls "C:\ProgramData\Microsoft\Windows\Hyper-V\Virtual Machines\71DB1869-534A-4B0B-B2B8-B89170FC0EF0.xml" /grant "NT VIRTUAL MACHINE\71DB1869-534A-4B0B-B2B8-B89170FC0EF0":(F) /L
Then you need to give access permissions to the Service SID to all files in VM01
Icacls F:\VM01\ /T /grant "NT VIRTUAL MACHINE\71DB1869-534A-4B0B-B2B8-B89170FC0EF0":(F)
Since VM01 has also Snapshots, we need to create the correspondent symbolic link and give the necessary permissions to the files (This process must be done to each snapshot).
Mklink "C:\ProgramData\Microsoft\Windows\Hyper-V\Snapshots\324E6E76-77EC-4671-9E25-3D4B5D3133BA.xml" "F:\VM01\Snapshots\71DB1869-534A-4B0B-B2B8-B89170FC0EF0.xml"
Mklink "C:\ProgramData\Microsoft\Windows\Hyper-V\Snapshots\D6EC4773-75A6-49E7-84D2-3B619D1D450C.xml" "F:\VM01\Snapshots\71DB1869-534A-4B0B-B2B8-B89170FC0EF0.xml"
Now, assign the permissions:
Icacls C:\ProgramData\Microsoft\Windows\Hyper-V\Snapshots\324E6E76-77EC-4671-9E25-3D4B5D3133BA.xml /grant "NT VIRTUAL MACHINE\71DB1869-534A-4B0B-B2B8-B89170FC0EF0":(F) /L
Icacls C:\ProgramData\Microsoft\Windows\Hyper-V\Snapshots\D6EC4773-75A6-49E7-84D2-3B619D1D450C.xml /grant "NT VIRTUAL MACHINE\71DB1869-534A-4B0B-B2B8-B89170FC0EF0":(F) /L
Go to the settings of the VM01 and assign the proper Network switch.
Start VM01 and you’re DONE!!!!
Enjoy.