Check out Mark’s latest Channel 9 interview on Windows 7 and Windows Server 2008 R2 kernel changes, released today to coincide with Windows 7’s general availability. He talks about memory management, process reflection and more, and shows a couple of demos on a 256-processor system.
"Windows 7 is here, available to all for purchase and ships today with new PCs! To celebrate this momentous occasion for Windows and Microsoft, Technical Fellow Mark Russinovich joins me in a discussion that extends the great conversation we had last year on Windows 7 internals. In his previous C9 interview, Mark told us about many of the new additions to the Windows kernel which enable Windows 7 (and Windows Server R2) to scale to large numbers of processors. Well, removing the kernel dispatcher lock is not all that the great Arun Kishan did. He also developed a new scheduling mechanism known as Distributed Fair Share Scheduling (DFSS). Mark describes what this is and how it works."
Check it here:
Mark Russinovich: Inside Windows 7 Redux
Friday, October 23, 2009
Friday, October 16, 2009
Remote Desktop Load Simulation Tools
After several customer requests, Microsoft has released the Remote Desktop Load Simulation tools to help you size your VDI deployments. Use Connect and give genuine feedback to the responsible teams.
The Remote Desktop Load Simulation toolset is used for server capacity planning and performance/scalability analysis.
In a server-based computing environment, all application execution and data processing occur on the server. Therefore it is extremely interesting to test the scalability and capacity of servers to determine how many client sessions a server can typically support under a variety of different scenarios. One of the most reliable ways to find out the number or users a server can support for a particular scenario is to log on a large number of users on the server simultaneously. The Remote Desktop Load Simulation tools provide the functionality which makes it possible to generate the required user load on the server.
Enjoy!!!
Boot From VHD and run Hyper-V in your Windows 7 box
Keith Combs wrote an excellent article about the How to boot from vhd in windows 7 and run Windows 2008 R2 with Hyper-v.
Keith wrote:
If you are running Windows 7 today, there’s no reason to tear down your machine, re-partition your drive, and reinstall your world. Instead, you can simply install Windows Server 2008 R2 into a .VHD file and make it bootable. After that is accomplished you can choose the OS you want when you power up your machine. The following steps are the simplest way (currently) to do this. It really doesn’t get any simpler.
Read more here.
Disc imaging can be a BAD THING in Windows World.
Why disc imaging can be a BAD THING in Windows World.
Many issues in Windows are caused by unsupported methods to Backup/Restore/Deploy procedures, Microsoft provides several methods to perform a correct deployment of the Windows operating system, but unfortunately some IT Professionals still don't understand why this is a BAD thing, to explain the details, MS has a KB that was updated today and that everyone should read before starting to deploy Imaging in their networks.
Remember, the use of a supported method is very important to make sure that the security of the systems that are running Windows is not compromised and that you don't run into issues that are caused by this technique.
Check KB162001
:)
Open Source PowerShell Cmdlet and Help Designer
PowerShell Cmdlet and Help Designer now available for download at CODEPLEX.
The Cmdlet Designer makes it much easier for teams to concentrate on the design, naming, and consistency of their cmdlets, while also guaranteeing name registration and collision avoidance across a project.
To sweeten the deal, it offers:
-Integrated help authoring
-Efficient bulk operations (parameter and cmdlet cloning)
-Generation of cmdlet code
-Full scripting support
-Automatic code-spec comparison and testing
-Role-based security, history logging, and more.
Architecturally, the Cmdlet Designer offers a reference implementation to benefit developers as well:
UI on top of Cmdlets
UI extensibility through scripting
Cmdlet / Webservice interaction
Role-based security, with a trusted subsystem implementation
Enjoy!
Wednesday, October 14, 2009
Technet - Live Migration Networks
Confused about which network does what with live migration? Problems determining how many networks you need for cluster shared volumes? This screencasts discusses how networks are used when live migration is configured with cluster shared volumes and shows which parameters you can configure to control traffic.$0 You can find more details on Giovanni's blog.
Cluster Validation Error due duplicate GUID information
The ASK Core Team recently blogged about an error that may occur in clusters if you use imaging to deploy servers without using sysprep.
The error:
Failover Cluster Validation Firewall Error in Windows Server 2008 R2
“An error occurred while executing the test. There was an error verifying the firewall configuration. An item with the same key has already been added”
Lesson learned, always use supported methods (Like Sysprep) to deploy the servers, especially when using imaging or disk rollback procedures
Read more Here
Windows 2008 R2 problems with HP Drivers
I decided to share with you some issues that I experienced with HP servers when upgrading to Windows 2008 R2. I discover that some settings that were working perfectly in Windows 2008 didn’t worked any more after I introduce the recent Windows 2008 R2, no matter if I did a upgrade or a clean install. These problems were common to Full and Core installations. The most common errors were:
Hyper-V servers (when adding new switches):
Error Applying New Virtual Network Changes
Setup switch failed.
Information is no longer available about this task because the object that monitors the process no longer exists. This may occur when many tasks are being processed.
After the process failure and consequent retry to get the vswitch on the correct NIC I got:
(Note:You also have some solutions in this POST to clear this error)
Error Applying New Virtual Network Changes
Binding to the external Ethernet
Cannot bind to the external Ethernet < NIC description> because it is already bound to another virtual network.

Hyper-V servers (when removing switches):
You might not have permissions to perform this task
Upgrading Servers (When running the NCU update):
The NCU setup sometimes fail to install/or upgrade and in some servers I had to stop some services in order to get the NCU installed (action that I would later regret).


The operation has failed.
Error in Validation. (Note: Some possible issues are also described in this POST)

Clusters creation Errors:
In Clusters, although the validation process ended ok, the process to create the cluster fails with the error:Validating installation of the Network FT Driver on node
Unable to successfully cleanup.
*************************************************
When I started to debug these problems I notice that they all had one thing in common, they were all network related problems.
Hum…
Ok, let’s start from the beginning, I checked the latest Firmware and Software (HP supported versions for Windows 2008 R2) and everything was fine, I was using the Smart Start 8.30 (18 Aug 2009) and I also did the upgrade for the latest Firmware version 8.60 (10 Aug 2009). Although everything seemed OK, the fact was that I still had those issues.
So, what to do next?
After several tests I come up with several conclusions to make this work, I’m not going to explain all of them nor am I going to explain in detail about the details of the processes. Instead I’m going to give you the easier way to implement and to get things done until HP solves this problem and hopefully give us an UPDATED version of some drivers and other software.
After several tests I concluded that these Network problems are ALL related with the drivers that are included in the Smart Start CD 8.30 (yep, the version that HP says that is supported to Windows 2008 R2). Most of these drivers and software have the date of August 2009, but it seems that they were not tested carefully enough to guarantee the minimum quality in order to function correctly in Windows 2008 R2. Yes I know, it’s October 2009 and things haven’t change.
That said, let’s start:
1- Before anything else, use the Firmware CD 8.60 or later and boot from the CD. In order to get HP support you need to update ALL existing hardware to the most recent firmware version.
2- After that, use the Smart Start CD 8.30 or later (hopefully when you read this HP already has an update version and you probably don’t need to follow this procedure) to start the server and installation process. After boot process the Smart Start CD stats a wizard and you’ll get a number of questions regarding to server name, organization, etc… when you get the option to choose the Installation mode, choose “CUSTOM”, this will allow you to choose what components you want to install at the end of Windows installation.

3- When the installation finishes a wizard is presented that will allow you to install the components available in the PSP, this will allow you to choose exactly what components you wish to install. In that Screen exclude the NCU (Network Configuration tool) from the driver/software installation process (you may also exclude the NICs if you want). If you don’t exclude the NCU at this step of the process you will probably have problems with network communications depending of the roles that you plan to install on that server.

4- The next step is to get the most recent version of the NICs drivers available online. DO NOT USE THE SMARTSTART CD 8.30 drivers or the DRIVERS that ARE ONLINE AT HP WEBSITE for the same version of the Smart Start CD 8.30; instead get the DRIVERS directly from the hardware provider (In my servers – Broadcom and Intel).
Note: I couldn’t get a version from Broadcom that specifically said that the driver was for Windows 2008 R2, instead I got the 12.26.02 version that has the date of 08/28/09 and according with Broadcom website this driver is for Windows 2008 x64. Intel already has drivers for Windows 2008 R2 for some NICs; you’ll need to check if your NIC is already on that list.
5- Be careful and take note of the date and driver version, I already had some servers that after the driver setup, the driver wasn’t properly updated as it should and I had to remove the driver, reboot the server and re-install it again. I also had scenarios (especially in server core) were I wasn’t able to perform the update because after driver removal, the NICs were lost and the only way to get them back (assuming Windows Full installs) was through the device manager. I had to use device manger to manually remove the NICs and them re-add them again using the option “Scan for hardware changes”, as you may know the device manger for server core installs can only be accessed remotely and is READ-ONLY, and the biggest problem in Server Core installs for this problem is that you don’t have a process that allows you to remove hardware in Cerver Core as you would in Full installs, so if that happens in you’re stuck, and you probably need to re-format the drive re-install the SO, the HP drivers and then perform the upgrade once again.
6- If server is going to be a Hyper-V server, remember that NCU should be only installed AFTER Hyper-V role is activated
(Note: NCU will also give you headaches and weird behaviors when used with wrong drivers, including those that ship with Windows and those that come in the Smart Start CD, multiple NICs, inability to change or remove them, communications issues, Hyper-V virtual switch errors, crashes, etc… are just some of the problems that you may experience with NCU and the wrong drivers).
7- Now that you’ve the correct version of the drivers and if you’re going to use that server with Hyper-V, it’s time to install the Hyper-V role, reboot and test. Assuming that you’re able to create/delete vswitchs without errors and your VMs can communicate through the interfaces you should be ready for NCU installation.
8- Use the latest version of NCU (at the moment I have the Ver.9.70). Install the NCU, reboot the server, and you should be ready to configure your first Team for the NICs. After creating the first NIC Team, try to create a vswitch on top of that new Team vInterface, after that make sure that a new NIC was created to the vswitch, test communications and finally test the removal of that vswitch, after removal recheck if the NIC that was created for the vswitch was also removed, if these tests were all OK, then you should ready to rock.
9- At this moment your problem should already be correct (at least temporarily until get the new versions of HP drivers/software, they know what is happening and I was told that they’re working on it).
10- If your server is going to be a cluster, my advice for you is this: “DO NOT INSTALL NCU – WAIT FOR THE NEW VERSION of NCU and NIC drivers that work with that new NCU”, if you do, and you start to get weird messages or problems when mounting new nodes like those explained at the beginning of this post, then you can say "Thank you" to the NCU.
Note: Sometimes even if you uninstall NCU the problems will NOT GO AWAY, the only way to get things working is to do a clean install or perform a manual removal of the tool, which can be very useful especially in Core installations. I also tried other technics like disable RSS, TCP Chimney, etc... I can tell you, in some scenarios I was able to solve the problem, in others not so well (again, this will depend of the role that the ser performs).
11- To finish this blog entry I wanted to say that when you decide that is time to move to Windows 2008 R2, do NOT go through the UPGRADE PATH (this will save you a lot of headaches), instead, and if possible, do a clean installation and them move the apps, Roles, etc.. to that server, I’m warning you, if go to the upgrade path, you may SORRY again and again like I did. If clean install is not an option, you should perform the upgrade in lab using an IDENTICAL SERVER (forget virtual servers especially if you need to perform hardware tests, use IDENTICAL HARDWARE), and them when possible, plan the move to a Windows 2008 R2.
Hopefully this will help you to understand and to recover from these errors.
Enjoy.
Sunday, October 11, 2009
Hyper-V Error: Error Applying New Virtual Network Changes - Cannot bind to because it is already bound to another virtual network.
Error Applying New Virtual Network Changes
Cannot bind to 
What is this error? What solutions do we have to solve this error in Windows 2008 R2 FULL installation and Core edition?
This error generally means that the “Microsoft Virtual Network Switch Adapter” is selected/in use by the physical NIC that you’re trying to use to configure your new Hyper-V virtual switch (vswitch). There’re many different reasons why this protocol may be selected, the most common are:
Because in fact you do have and vswitch assigned to that physical card, and before you use that NIC to add a new vswitch you need to unbound it from the existing vswitch to add the new one.
You manually selected the “Microsoft Virtual Network Switch Adapter” under your NIC properties (Note: do not try to select Microsoft Virtual Network Switch Adapter as an attempt to bind that NIC to a existent vswitch or to create a new one, instead always use the hyper-v management console or the System Center Virtual Machine to create new vswitch, the same is true for existing vswitchs, DO NOT select this protocol on NICs that REPRESENT the VSwitch, remember only the physical NIC that HAS A VSWITCH bound should have this protocol selected).
You installed software to manage your NICs or Teams and now you’re having weird errors (as described in another post for HP servers) and when you attempt to repeat the process you get this error.
These are the most common ones.
How to solve this problem:
Note: Before proceed I suggest that you do a full backup of the system that you’re trying to repair, some procedures explained here will change configurations and some registry settings that may break other functionalities. Before removing any vswitch, make sure that you don’t have virtual machines assigned to it, if so, you’ll need to reconfigure those VMs to a new vswitch before those VMS be able to get network communications again, also be careful when unbinding the “Microsoft Virtual Network Switch Adapter” from a given physical NIC, if that physical NIC is associated with a vswitch and you remove the “Microsoft Virtual Network Switch Adapter” from it, the vswitch will not be able to function properly.
That said, let’s begin.
Identify if an existing vswitch is bound to the NIC that you’re trying use, if you already have a vswitch assigned to that physical NIC you need to use a different physical NIC to configure the new vswitch or unbound the existing vswitch before configuring the new one.
1 - First let’s identify the NIC GUID that is having problems. Open command prompt and type:
WMIC NICCONFIG GET Description,SettingID
The result will be something similar to this

In my scenario the GUID for the NIC is {F9A4CE20-59D1-4C64-BA39-6487862361A4}.
Note: The GUID will differ in your server.
2 - Using the Hyper-V Manager console (in core editions use the Hyper-V manager console to remotely connect to the physical host): Connect to the host that you’re trying to create the new vswitch, then in the right pane select the option “Virtual Network Manager”, after that a new window appears and will allow you to identify if the physical NIC is already in use by an existing vswitch.

3 - I don’t have any vswitch configured to use the physical NIC but I still get the error: In this scenario check if the “Microsoft Virtual Network Switch Adapter” is selected in the NIC that you’re using to configure your new Hyper-V virtual switch, from cmd type “ncpa.cpl”, this will open the network connections folder, right click in the NIC and check if the “Microsoft Virtual Network Switch Adapter” is selected, if it’s then unselect it and try again.


3.a - Unfortunately this is not an option in Core Installations, in Core installations you’ll need to use a tool called “nvspbind”. Download the tool to “c:\windows\system32” directory and from cmd type
“nvspbind.exe -n”

This will display NIC information, identify the NIC GUID (check step 1) and to remove the Microsoft Virtual Network Switch Adapter from it type “nvspbind.exe –u {GUID}” in this case would be:
“nvspbind.exe -u {F9A4CE20-59D1-4C64-BA39-6487862361A4}”

Ok ENIAC, nice tips but I still have the problem, what to do next??!!!
In some scenarios things can get pretty ugly and the previous tips may not be enough to solve this error, if that is your case take a deep breath and let’s continue…
Let’s try some global cleanup process. (Did you read the Note that I wrote at the beginning of solution process in this post? NO!!!! Now is a good time to go there and read it, it talks about backups and other things that you may want to be aware of).
The first one is to use a tool called “nvspscrub.js”. Download nvspscrub.js then from cmd run: “cscript nvspscrub.js”, this will delete all vswitches, virtual NICs in the parent partition and will unbind the switch protocol from all physical NICs.
Run the tool, reboot the server and try again…
If the “nvspscrub.js” didn't work for you then you can try the last resource tool. The netcfg tool (use this procedure as last resource only). You can use this tool to install/uninstall Network Protocols, services and clients. From cmd type:
netcfg -u vms_pp
This will uninstall switch protocol and will remove it from all your NICs as well.
Reboot the server then from cmd type:
netcfg -l c:\windows\winsxs\amd64_wvms_pp.inf_31bf3856ad364e35_6.1.7600.16385_none_beda85050b13680c\wvms_pp.inf -c p -i vms_pp
This will install the protocol again and make it available to use on the NICs but by default will disabled in all NICs.
Reboot the server and try again…
To end this blog entry, and especially because this can be useful in core installations, I will show you some registry entries that may help you to identify where the NICs are their configuration, vswitches and NICs associated, etc... I suggest that DO NOT use the registry to remove or change any configuration mentioned before, instead use the tools or the cmds provided in the previous steps.
The first one is the:
HKEY_LOCAL_MACHINE\SYSTEM\CurrentControlSet\Control\Class\{4D36E972-E325-11CE-BFC1-08002BE10318}
Under this path you can find all your existing NIC adapters, the Microsoft Virtual Network Switch Adapter (vms_mp), etc… Scrolling down to the numbers listed under this path you’ll find the interfaces that exist in your server and some properties associated with it. You can also find some configuration definitions, like bounded protocols, GUIDs, file driver path, etc (Note: these numbers will differ from server to server).
Under 007\ you can find some interesting information about the physical NIC that I repaired in previous steps. Here I can identify some useful information like DriverDescription, Version, InfoPath, GUID, etc…


If the physical NIC had a vswitch associated with it, only “VMSP” would be listed like this.

The next registry path that you may want to know about it is the:
HKEY_LOCAL_MACHINE\SYSTEM\CurrentControlSet\services\VMSMP
and
HKEY_LOCAL_MACHINE\SYSTEM\CurrentControlSet\services\VMSP
Here you’ll find information about listed physical NICs in use, Virtual Switches and some properties. For example, when you are using a given physical NIC with vswitch, the physical NIC GUID should be listed under:
HKEY_LOCAL_MACHINE\SYSTEM\CurrentControlSet\services\VMSP\Linkage\“Bind” & “Export” & “Route” as the picture shows, additionally that same NIC GUID will also appear in HKEY_LOCAL_MACHINE\SYSTEM\CurrentControlSet\services\VMSMP\Parameters\NicList\/DEVICE/{GUID}

Also note the difference between how a physical NIC (starts with /DEVICE/{GUID}) is listed under NicList and how a vswitch (starts with GUID) is listed in the same path.


Hopefully this blog entry will help you to resolve the error “Cannot bind to
Have Fun!!!
Friday, October 9, 2009
Exchange 2010 RTM!
The big news today is that Exchange 2010 is now code complete. The senior leadership team has signed off on the final code, and it has been sent to early adopters for a final look before its public release.
Read more here
Read more here
Thursday, October 8, 2009
Free Exchange 2010 Learning
Check it out some free resources for Exchange 2010 Learning posted at Arlindo's blog
Here are the links to all of this free content:
Free Silverlight Learning Snacks:
- Unified Messaging in Exchange 2010
- High Availability and Storage in Exchange 2010
Free PrePress Chapter Downloads:
- Free Chapters from Exchange 2010 Administrator’s Pocket Consultant
o Chapter 1: Exchange Server Administration Overview AND Chapter 6: Mailbox Administration
Free eLearning Clinics:
- Collection 6899: Exploring Features in Exchange 2010 (2-hours)
- Collection 6900: Introduction to Exchange 2010 (1-hour)
- Collection 6901: Exchange Server 2010 in an Enterprise (1-hour)
Microsoft’s Exchange Server 2010 Learning Portal:
- www.microsoft.com/learning/exchange
Windows 7 Guides
Here's some useful documentation for Windows 7
Building a Standard Image of Windows 7 Step-by-Step Guide
Automated Installation To Upgrade Windows 7 Step-by-Step Guide
Automated Installation of Windows 7 Overview
Upgrading to Windows 7 for Small and Midsize Businesses
Windows XP to Windows 7 Hard-Link Migration of User Files and Settings
BranchCache Deployment Guide for Windows Server 2008 R2 and Windows 7
Wednesday, October 7, 2009
Sysinternals new Tool Disk2vhd v1.0
Disk2vhd is a utility that creates VHD (Virtual Hard Disk - Microsoft’s Virtual Machine disk format) versions of physical disks for use in Microsoft Virtual PC or Microsoft Hyper-V virtual machines (VMs). The difference between Disk2vhd and other physical-to-virtual tools is that you can run Disk2vhd on a system that’s online. Disk2vhd uses Windows’ Volume Snapshot capability, introduced in Windows XP, to create consistent point-in-time snapshots of the volumes you want to include in a conversion. You can even have Disk2vhd create the VHDs on local volumes, even ones being converted (though performance is better when the VHD is on a disk different than ones being converted).
Disk2vhd runs Windows XP SP2, Windows Server 2003 SP1, and higher, including x64 systems.
Check more here
Well done Mark :)
Disk2vhd runs Windows XP SP2, Windows Server 2003 SP1, and higher, including x64 systems.
Check more here
Well done Mark :)
RedHat Support for Hyper-V
Microsoft announced that they have completed a mutual support program with RedHat.
Now we have support for both enterprise Linux platforms on Hyper-V; SUSE being the other one. And both can be monitored from hardware to service using Operations Manager 2007 R2.
Details:
- Red Hat Enterprise Linux 5.2, 5.3, 5.4 have passed cert tests when running on Windows Server 2008 Hyper-V, Microsoft Hyper-V Server 2008, Windows Server 2008 R2 Hyper-V, Microsoft Hyper-V Server 2008 R2. See more at RedHat's certified hardware site.
- Windows Server 2003/ Windows Server 2008 / Windows Server 2008 R2 are validated to run on Red Hat Enterprise Linux 5.4, using their KVM-based hypervisor. See more at Microsoft Server Virtualization Validation Program site.
Monday, October 5, 2009
Windows 2008 R2 Cluster Error: The Argument is null or empty String
One of these days I got this error when configuring a Hyper-V Cluster (To create a cluster in Windows 2008 R2 check my previous post here).
Error:
The Argument is null or empty String.
Parameter name: Domain Name
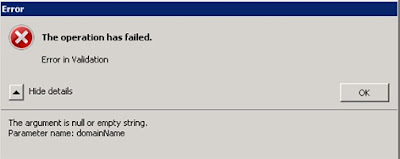
What the Heck !!! The cluster validation went without problems, what could be the cause of this error??!!
Try the following:
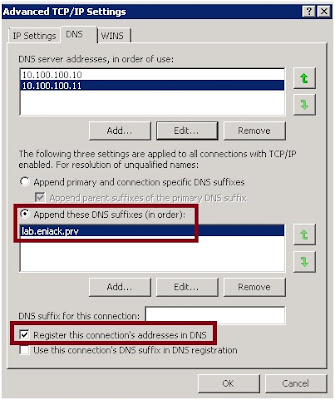
1 - Make sure that your NIC DNS settings contain the correct IP for your domain DNS servers.
2 - Make sure that the option "Register this connection's address in DNS" is selected in ALL NODES of the CLUSTER. By default this option is selected.
3 - In more complex domain environments, depending of your Domain/and/DNS design you may need to select the option "Append these DNS suffixes (in order)" and then manually enter the FQDN of your domain name and if needed of other existing domains. You may start only with your FQDN and then you can latter add the other ones.
4 - If you have multiple NICs, disable all except the one, review DNS settings and try again, doing this will help you to isolate the root cause of the problem, and if success, review the configurations on these NICs (FW, IPAddress, Routes, etc...).
5 - Reboot the server and check if the server correctly register his DNS IP on your DNS servers.
Hum... Okay ENICKB, but and if I'm in a Windows 2008 R2 Core Edition?
If you're in a Core Edition you need to change the registry accordantly
Register this connection's addresses in DNS is located at:
HKEY_LOCAL_MACHINE\SYSTEM\CurrentControlSet\services\Tcpip\Parameters\Interfaces\{Interface GUID}\ RegistrationEnabled
and change the value from "0" to "1".
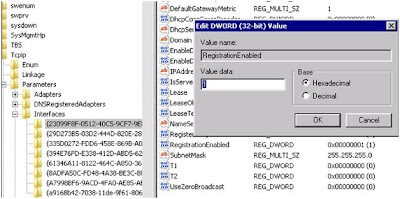
Note: Your {Interface GUID} will differ from those in the picture. Additionally you may need to configure this setting in one or more NICs.
Append these DNS suffixes (in order)":
HKEY_LOCAL_MACHINE\SYSTEM\CurrentControlSet\services\Tcpip\Parameters\SearchList

Error:
The Argument is null or empty String.
Parameter name: Domain Name

What the Heck !!! The cluster validation went without problems, what could be the cause of this error??!!
Try the following:
1 - Make sure that your NIC DNS settings contain the correct IP for your domain DNS servers.
2 - Make sure that the option "Register this connection's address in DNS" is selected in ALL NODES of the CLUSTER. By default this option is selected.
3 - In more complex domain environments, depending of your Domain/and/DNS design you may need to select the option "Append these DNS suffixes (in order)" and then manually enter the FQDN of your domain name and if needed of other existing domains. You may start only with your FQDN and then you can latter add the other ones.
4 - If you have multiple NICs, disable all except the one, review DNS settings and try again, doing this will help you to isolate the root cause of the problem, and if success, review the configurations on these NICs (FW, IPAddress, Routes, etc...).
5 - Reboot the server and check if the server correctly register his DNS IP on your DNS servers.

Hum... Okay ENICKB, but and if I'm in a Windows 2008 R2 Core Edition?
If you're in a Core Edition you need to change the registry accordantly
Register this connection's addresses in DNS is located at:
HKEY_LOCAL_MACHINE\SYSTEM\CurrentControlSet\services\Tcpip\Parameters\Interfaces\{Interface GUID}\ RegistrationEnabled
and change the value from "0" to "1".

Note: Your {Interface GUID} will differ from those in the picture. Additionally you may need to configure this setting in one or more NICs.
Append these DNS suffixes (in order)":
HKEY_LOCAL_MACHINE\SYSTEM\CurrentControlSet\services\Tcpip\Parameters\SearchList

Additional note, when using the cluster wizard to add nodes of the future cluster try adding them using the FQDN of the servers, but remember, even if you add the NetBIOS Name of these servers, when you press enter they should be changed from NetBIOS format to FQDN.
Hopefully this will help you with your cluster creation successfully.
Subscribe to:
Posts (Atom)


