Recently the ASKCORE Team wrote an excellent article about the most common problems that they receive from their clients regarding to Hyper-V R2 Live Migration.
According to them, the most common problems are related with some bad habits and bad decisions regarding to network configurations. The article also explain some techniques to increase the speed of the process (they’ve called it – Bonus Material :)).
Read more at “The devil may be in the networking details.”
Showing posts with label Troubleshooting. Show all posts
Showing posts with label Troubleshooting. Show all posts
Thursday, December 10, 2009

Thursday, November 19, 2009
Hyper-V Cluster Error: An error occurred while creating the cluster. An error occurred creating cluster 'clustername'. The service has not been started.
Here’s an interesting one that I already run a couple of times. You try to create a cluster at Hyper-V, the cluster pass all validation tests, then, at the final phase of the cluster creation, the process fails with the following error:
An error occurred while creating the cluster. An error occurred creating cluster 'clustername'. The service has not been started.
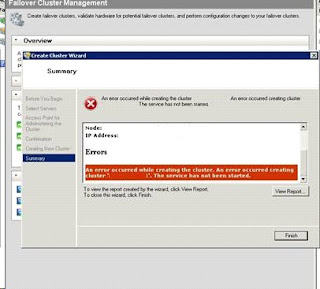
After this, the cluster computer account is removed from Active Directory!!!
After a closest check, I notice that the problem is related with the “Microsoft Failover Cluster Virtual Adapter” - “This device cannot start. (Code 10)”.

Hum…
After a reboot I saw the following errors at the event log:
EventID 4872:
The failover cluster virtual adapter failed to generate a unique MAC address. Either it was unable to find a physical Ethernet adapter from which to generate a unique address or the generated address conflicts with another adapter on this machine. Please run the Validate a Configuration wizard to check your network configuration.
and
EventID 4871:
The cluster service failed to start. This was because the failover cluster virtual adapter failed to initialize the miniport adapter. The error code was '2147483674'. Verify that other network adapters are functioning properly and check the device manager for errors. If the configuration was changed, it may be necessary to reinstall the failover clustering feature on this computer.
Okay, something is wrong with the MAC Address creation for the Microsoft Failover Cluster Virtual Adapter. What can we do about that?
Solution:
(Before proceeding, make sure that you backup of your registry)
- Open registry, and navigate to the following registry subkey:
HKEY_LOCAL_MACHINE\SYSTEM\ControlSet001\Control\Class\{4D36E972-E325-11CE-BFC1-08002BE10318}
- Under this subkey, find the subkey that holds a DriverDesc string value entry whose value is "Microsoft Failover Cluster Virtual Adapter." (NOTE: 007 was the key designated were the Microsoft Failover Cluster Virtual Adapter was in my server, but this number may vary on different servers.)

- Under the subkey (in my scenario "007"), add the following string value registry entry:
Name: DatalinkAddress
Value data: 02-AA-BB-CC-DD-01
String Value (REG_SZ)
Restart the computer.
DONE!!!
Repeat these steps for computers were you're having this problem. When you do this on other computers, replace the value data of the registry with different values in order to set a unique value for each node. For example, set the value on the second node to 02-AA-BB-CC-DD-02, and set value on the third node to 02-AA-BB-CC-DD-03. If you notice this behavior on distinct clusters, make sure that you use an address for each node that is unique across all clusters.
Recently, Microsoft has released the KB973838 that describes the same issue.
Have Fun!!!
An error occurred while creating the cluster. An error occurred creating cluster 'clustername'. The service has not been started.

After this, the cluster computer account is removed from Active Directory!!!
After a closest check, I notice that the problem is related with the “Microsoft Failover Cluster Virtual Adapter” - “This device cannot start. (Code 10)”.

After a reboot I saw the following errors at the event log:
EventID 4872:
The failover cluster virtual adapter failed to generate a unique MAC address. Either it was unable to find a physical Ethernet adapter from which to generate a unique address or the generated address conflicts with another adapter on this machine. Please run the Validate a Configuration wizard to check your network configuration.
and
EventID 4871:
The cluster service failed to start. This was because the failover cluster virtual adapter failed to initialize the miniport adapter. The error code was '2147483674'. Verify that other network adapters are functioning properly and check the device manager for errors. If the configuration was changed, it may be necessary to reinstall the failover clustering feature on this computer.
Okay, something is wrong with the MAC Address creation for the Microsoft Failover Cluster Virtual Adapter. What can we do about that?
Solution:
(Before proceeding, make sure that you backup of your registry)
- Open registry, and navigate to the following registry subkey:
HKEY_LOCAL_MACHINE\SYSTEM\ControlSet001\Control\Class\{4D36E972-E325-11CE-BFC1-08002BE10318}
- Under this subkey, find the subkey that holds a DriverDesc string value entry whose value is "Microsoft Failover Cluster Virtual Adapter." (NOTE: 007 was the key designated were the Microsoft Failover Cluster Virtual Adapter was in my server, but this number may vary on different servers.)

- Under the subkey (in my scenario "007"), add the following string value registry entry:
Name: DatalinkAddress
Value data: 02-AA-BB-CC-DD-01
String Value (REG_SZ)
Restart the computer.
DONE!!!
Repeat these steps for computers were you're having this problem. When you do this on other computers, replace the value data of the registry with different values in order to set a unique value for each node. For example, set the value on the second node to 02-AA-BB-CC-DD-02, and set value on the third node to 02-AA-BB-CC-DD-03. If you notice this behavior on distinct clusters, make sure that you use an address for each node that is unique across all clusters.
Recently, Microsoft has released the KB973838 that describes the same issue.
Have Fun!!!
Wednesday, October 14, 2009
Cluster Validation Error due duplicate GUID information
The ASK Core Team recently blogged about an error that may occur in clusters if you use imaging to deploy servers without using sysprep.
The error:
Failover Cluster Validation Firewall Error in Windows Server 2008 R2
“An error occurred while executing the test. There was an error verifying the firewall configuration. An item with the same key has already been added”
Lesson learned, always use supported methods (Like Sysprep) to deploy the servers, especially when using imaging or disk rollback procedures
Read more Here
Windows 2008 R2 problems with HP Drivers
I decided to share with you some issues that I experienced with HP servers when upgrading to Windows 2008 R2. I discover that some settings that were working perfectly in Windows 2008 didn’t worked any more after I introduce the recent Windows 2008 R2, no matter if I did a upgrade or a clean install. These problems were common to Full and Core installations. The most common errors were:
Hyper-V servers (when adding new switches):
Error Applying New Virtual Network Changes
Setup switch failed.
Information is no longer available about this task because the object that monitors the process no longer exists. This may occur when many tasks are being processed.
After the process failure and consequent retry to get the vswitch on the correct NIC I got:
(Note:You also have some solutions in this POST to clear this error)
Error Applying New Virtual Network Changes
Binding to the external Ethernet
Cannot bind to the external Ethernet < NIC description> because it is already bound to another virtual network.

Hyper-V servers (when removing switches):
You might not have permissions to perform this task
Upgrading Servers (When running the NCU update):
The NCU setup sometimes fail to install/or upgrade and in some servers I had to stop some services in order to get the NCU installed (action that I would later regret).


The operation has failed.
Error in Validation. (Note: Some possible issues are also described in this POST)

Clusters creation Errors:
In Clusters, although the validation process ended ok, the process to create the cluster fails with the error:Validating installation of the Network FT Driver on node
Unable to successfully cleanup.
*************************************************
When I started to debug these problems I notice that they all had one thing in common, they were all network related problems.
Hum…
Ok, let’s start from the beginning, I checked the latest Firmware and Software (HP supported versions for Windows 2008 R2) and everything was fine, I was using the Smart Start 8.30 (18 Aug 2009) and I also did the upgrade for the latest Firmware version 8.60 (10 Aug 2009). Although everything seemed OK, the fact was that I still had those issues.
So, what to do next?
After several tests I come up with several conclusions to make this work, I’m not going to explain all of them nor am I going to explain in detail about the details of the processes. Instead I’m going to give you the easier way to implement and to get things done until HP solves this problem and hopefully give us an UPDATED version of some drivers and other software.
After several tests I concluded that these Network problems are ALL related with the drivers that are included in the Smart Start CD 8.30 (yep, the version that HP says that is supported to Windows 2008 R2). Most of these drivers and software have the date of August 2009, but it seems that they were not tested carefully enough to guarantee the minimum quality in order to function correctly in Windows 2008 R2. Yes I know, it’s October 2009 and things haven’t change.
That said, let’s start:
1- Before anything else, use the Firmware CD 8.60 or later and boot from the CD. In order to get HP support you need to update ALL existing hardware to the most recent firmware version.
2- After that, use the Smart Start CD 8.30 or later (hopefully when you read this HP already has an update version and you probably don’t need to follow this procedure) to start the server and installation process. After boot process the Smart Start CD stats a wizard and you’ll get a number of questions regarding to server name, organization, etc… when you get the option to choose the Installation mode, choose “CUSTOM”, this will allow you to choose what components you want to install at the end of Windows installation.

3- When the installation finishes a wizard is presented that will allow you to install the components available in the PSP, this will allow you to choose exactly what components you wish to install. In that Screen exclude the NCU (Network Configuration tool) from the driver/software installation process (you may also exclude the NICs if you want). If you don’t exclude the NCU at this step of the process you will probably have problems with network communications depending of the roles that you plan to install on that server.

4- The next step is to get the most recent version of the NICs drivers available online. DO NOT USE THE SMARTSTART CD 8.30 drivers or the DRIVERS that ARE ONLINE AT HP WEBSITE for the same version of the Smart Start CD 8.30; instead get the DRIVERS directly from the hardware provider (In my servers – Broadcom and Intel).
Note: I couldn’t get a version from Broadcom that specifically said that the driver was for Windows 2008 R2, instead I got the 12.26.02 version that has the date of 08/28/09 and according with Broadcom website this driver is for Windows 2008 x64. Intel already has drivers for Windows 2008 R2 for some NICs; you’ll need to check if your NIC is already on that list.
5- Be careful and take note of the date and driver version, I already had some servers that after the driver setup, the driver wasn’t properly updated as it should and I had to remove the driver, reboot the server and re-install it again. I also had scenarios (especially in server core) were I wasn’t able to perform the update because after driver removal, the NICs were lost and the only way to get them back (assuming Windows Full installs) was through the device manager. I had to use device manger to manually remove the NICs and them re-add them again using the option “Scan for hardware changes”, as you may know the device manger for server core installs can only be accessed remotely and is READ-ONLY, and the biggest problem in Server Core installs for this problem is that you don’t have a process that allows you to remove hardware in Cerver Core as you would in Full installs, so if that happens in you’re stuck, and you probably need to re-format the drive re-install the SO, the HP drivers and then perform the upgrade once again.
6- If server is going to be a Hyper-V server, remember that NCU should be only installed AFTER Hyper-V role is activated
(Note: NCU will also give you headaches and weird behaviors when used with wrong drivers, including those that ship with Windows and those that come in the Smart Start CD, multiple NICs, inability to change or remove them, communications issues, Hyper-V virtual switch errors, crashes, etc… are just some of the problems that you may experience with NCU and the wrong drivers).
7- Now that you’ve the correct version of the drivers and if you’re going to use that server with Hyper-V, it’s time to install the Hyper-V role, reboot and test. Assuming that you’re able to create/delete vswitchs without errors and your VMs can communicate through the interfaces you should be ready for NCU installation.
8- Use the latest version of NCU (at the moment I have the Ver.9.70). Install the NCU, reboot the server, and you should be ready to configure your first Team for the NICs. After creating the first NIC Team, try to create a vswitch on top of that new Team vInterface, after that make sure that a new NIC was created to the vswitch, test communications and finally test the removal of that vswitch, after removal recheck if the NIC that was created for the vswitch was also removed, if these tests were all OK, then you should ready to rock.
9- At this moment your problem should already be correct (at least temporarily until get the new versions of HP drivers/software, they know what is happening and I was told that they’re working on it).
10- If your server is going to be a cluster, my advice for you is this: “DO NOT INSTALL NCU – WAIT FOR THE NEW VERSION of NCU and NIC drivers that work with that new NCU”, if you do, and you start to get weird messages or problems when mounting new nodes like those explained at the beginning of this post, then you can say "Thank you" to the NCU.
Note: Sometimes even if you uninstall NCU the problems will NOT GO AWAY, the only way to get things working is to do a clean install or perform a manual removal of the tool, which can be very useful especially in Core installations. I also tried other technics like disable RSS, TCP Chimney, etc... I can tell you, in some scenarios I was able to solve the problem, in others not so well (again, this will depend of the role that the ser performs).
11- To finish this blog entry I wanted to say that when you decide that is time to move to Windows 2008 R2, do NOT go through the UPGRADE PATH (this will save you a lot of headaches), instead, and if possible, do a clean installation and them move the apps, Roles, etc.. to that server, I’m warning you, if go to the upgrade path, you may SORRY again and again like I did. If clean install is not an option, you should perform the upgrade in lab using an IDENTICAL SERVER (forget virtual servers especially if you need to perform hardware tests, use IDENTICAL HARDWARE), and them when possible, plan the move to a Windows 2008 R2.
Hopefully this will help you to understand and to recover from these errors.
Enjoy.
Sunday, October 11, 2009
Hyper-V Error: Error Applying New Virtual Network Changes - Cannot bind to because it is already bound to another virtual network.
Error Applying New Virtual Network Changes
Cannot bind to 
What is this error? What solutions do we have to solve this error in Windows 2008 R2 FULL installation and Core edition?
This error generally means that the “Microsoft Virtual Network Switch Adapter” is selected/in use by the physical NIC that you’re trying to use to configure your new Hyper-V virtual switch (vswitch). There’re many different reasons why this protocol may be selected, the most common are:
Because in fact you do have and vswitch assigned to that physical card, and before you use that NIC to add a new vswitch you need to unbound it from the existing vswitch to add the new one.
You manually selected the “Microsoft Virtual Network Switch Adapter” under your NIC properties (Note: do not try to select Microsoft Virtual Network Switch Adapter as an attempt to bind that NIC to a existent vswitch or to create a new one, instead always use the hyper-v management console or the System Center Virtual Machine to create new vswitch, the same is true for existing vswitchs, DO NOT select this protocol on NICs that REPRESENT the VSwitch, remember only the physical NIC that HAS A VSWITCH bound should have this protocol selected).
You installed software to manage your NICs or Teams and now you’re having weird errors (as described in another post for HP servers) and when you attempt to repeat the process you get this error.
These are the most common ones.
How to solve this problem:
Note: Before proceed I suggest that you do a full backup of the system that you’re trying to repair, some procedures explained here will change configurations and some registry settings that may break other functionalities. Before removing any vswitch, make sure that you don’t have virtual machines assigned to it, if so, you’ll need to reconfigure those VMs to a new vswitch before those VMS be able to get network communications again, also be careful when unbinding the “Microsoft Virtual Network Switch Adapter” from a given physical NIC, if that physical NIC is associated with a vswitch and you remove the “Microsoft Virtual Network Switch Adapter” from it, the vswitch will not be able to function properly.
That said, let’s begin.
Identify if an existing vswitch is bound to the NIC that you’re trying use, if you already have a vswitch assigned to that physical NIC you need to use a different physical NIC to configure the new vswitch or unbound the existing vswitch before configuring the new one.
1 - First let’s identify the NIC GUID that is having problems. Open command prompt and type:
WMIC NICCONFIG GET Description,SettingID
The result will be something similar to this

In my scenario the GUID for the NIC is {F9A4CE20-59D1-4C64-BA39-6487862361A4}.
Note: The GUID will differ in your server.
2 - Using the Hyper-V Manager console (in core editions use the Hyper-V manager console to remotely connect to the physical host): Connect to the host that you’re trying to create the new vswitch, then in the right pane select the option “Virtual Network Manager”, after that a new window appears and will allow you to identify if the physical NIC is already in use by an existing vswitch.

3 - I don’t have any vswitch configured to use the physical NIC but I still get the error: In this scenario check if the “Microsoft Virtual Network Switch Adapter” is selected in the NIC that you’re using to configure your new Hyper-V virtual switch, from cmd type “ncpa.cpl”, this will open the network connections folder, right click in the NIC and check if the “Microsoft Virtual Network Switch Adapter” is selected, if it’s then unselect it and try again.


3.a - Unfortunately this is not an option in Core Installations, in Core installations you’ll need to use a tool called “nvspbind”. Download the tool to “c:\windows\system32” directory and from cmd type
“nvspbind.exe -n”

This will display NIC information, identify the NIC GUID (check step 1) and to remove the Microsoft Virtual Network Switch Adapter from it type “nvspbind.exe –u {GUID}” in this case would be:
“nvspbind.exe -u {F9A4CE20-59D1-4C64-BA39-6487862361A4}”

Ok ENIAC, nice tips but I still have the problem, what to do next??!!!
In some scenarios things can get pretty ugly and the previous tips may not be enough to solve this error, if that is your case take a deep breath and let’s continue…
Let’s try some global cleanup process. (Did you read the Note that I wrote at the beginning of solution process in this post? NO!!!! Now is a good time to go there and read it, it talks about backups and other things that you may want to be aware of).
The first one is to use a tool called “nvspscrub.js”. Download nvspscrub.js then from cmd run: “cscript nvspscrub.js”, this will delete all vswitches, virtual NICs in the parent partition and will unbind the switch protocol from all physical NICs.
Run the tool, reboot the server and try again…
If the “nvspscrub.js” didn't work for you then you can try the last resource tool. The netcfg tool (use this procedure as last resource only). You can use this tool to install/uninstall Network Protocols, services and clients. From cmd type:
netcfg -u vms_pp
This will uninstall switch protocol and will remove it from all your NICs as well.
Reboot the server then from cmd type:
netcfg -l c:\windows\winsxs\amd64_wvms_pp.inf_31bf3856ad364e35_6.1.7600.16385_none_beda85050b13680c\wvms_pp.inf -c p -i vms_pp
This will install the protocol again and make it available to use on the NICs but by default will disabled in all NICs.
Reboot the server and try again…
To end this blog entry, and especially because this can be useful in core installations, I will show you some registry entries that may help you to identify where the NICs are their configuration, vswitches and NICs associated, etc... I suggest that DO NOT use the registry to remove or change any configuration mentioned before, instead use the tools or the cmds provided in the previous steps.
The first one is the:
HKEY_LOCAL_MACHINE\SYSTEM\CurrentControlSet\Control\Class\{4D36E972-E325-11CE-BFC1-08002BE10318}
Under this path you can find all your existing NIC adapters, the Microsoft Virtual Network Switch Adapter (vms_mp), etc… Scrolling down to the numbers listed under this path you’ll find the interfaces that exist in your server and some properties associated with it. You can also find some configuration definitions, like bounded protocols, GUIDs, file driver path, etc (Note: these numbers will differ from server to server).
Under 007\ you can find some interesting information about the physical NIC that I repaired in previous steps. Here I can identify some useful information like DriverDescription, Version, InfoPath, GUID, etc…


If the physical NIC had a vswitch associated with it, only “VMSP” would be listed like this.

The next registry path that you may want to know about it is the:
HKEY_LOCAL_MACHINE\SYSTEM\CurrentControlSet\services\VMSMP
and
HKEY_LOCAL_MACHINE\SYSTEM\CurrentControlSet\services\VMSP
Here you’ll find information about listed physical NICs in use, Virtual Switches and some properties. For example, when you are using a given physical NIC with vswitch, the physical NIC GUID should be listed under:
HKEY_LOCAL_MACHINE\SYSTEM\CurrentControlSet\services\VMSP\Linkage\“Bind” & “Export” & “Route” as the picture shows, additionally that same NIC GUID will also appear in HKEY_LOCAL_MACHINE\SYSTEM\CurrentControlSet\services\VMSMP\Parameters\NicList\/DEVICE/{GUID}

Also note the difference between how a physical NIC (starts with /DEVICE/{GUID}) is listed under NicList and how a vswitch (starts with GUID) is listed in the same path.


Hopefully this blog entry will help you to resolve the error “Cannot bind to
Have Fun!!!
Monday, October 5, 2009
Windows 2008 R2 Cluster Error: The Argument is null or empty String
One of these days I got this error when configuring a Hyper-V Cluster (To create a cluster in Windows 2008 R2 check my previous post here).
Error:
The Argument is null or empty String.
Parameter name: Domain Name
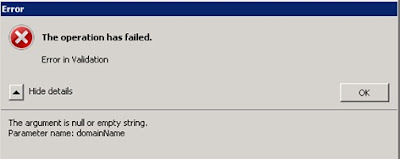
What the Heck !!! The cluster validation went without problems, what could be the cause of this error??!!
Try the following:
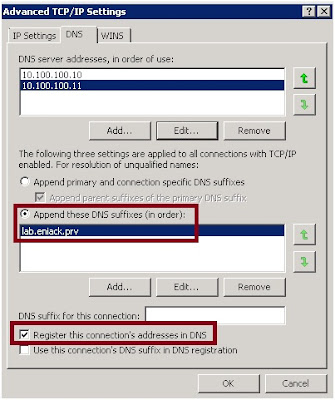
1 - Make sure that your NIC DNS settings contain the correct IP for your domain DNS servers.
2 - Make sure that the option "Register this connection's address in DNS" is selected in ALL NODES of the CLUSTER. By default this option is selected.
3 - In more complex domain environments, depending of your Domain/and/DNS design you may need to select the option "Append these DNS suffixes (in order)" and then manually enter the FQDN of your domain name and if needed of other existing domains. You may start only with your FQDN and then you can latter add the other ones.
4 - If you have multiple NICs, disable all except the one, review DNS settings and try again, doing this will help you to isolate the root cause of the problem, and if success, review the configurations on these NICs (FW, IPAddress, Routes, etc...).
5 - Reboot the server and check if the server correctly register his DNS IP on your DNS servers.
Hum... Okay ENICKB, but and if I'm in a Windows 2008 R2 Core Edition?
If you're in a Core Edition you need to change the registry accordantly
Register this connection's addresses in DNS is located at:
HKEY_LOCAL_MACHINE\SYSTEM\CurrentControlSet\services\Tcpip\Parameters\Interfaces\{Interface GUID}\ RegistrationEnabled
and change the value from "0" to "1".
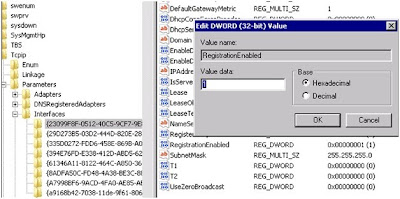
Note: Your {Interface GUID} will differ from those in the picture. Additionally you may need to configure this setting in one or more NICs.
Append these DNS suffixes (in order)":
HKEY_LOCAL_MACHINE\SYSTEM\CurrentControlSet\services\Tcpip\Parameters\SearchList

Error:
The Argument is null or empty String.
Parameter name: Domain Name

What the Heck !!! The cluster validation went without problems, what could be the cause of this error??!!
Try the following:
1 - Make sure that your NIC DNS settings contain the correct IP for your domain DNS servers.
2 - Make sure that the option "Register this connection's address in DNS" is selected in ALL NODES of the CLUSTER. By default this option is selected.
3 - In more complex domain environments, depending of your Domain/and/DNS design you may need to select the option "Append these DNS suffixes (in order)" and then manually enter the FQDN of your domain name and if needed of other existing domains. You may start only with your FQDN and then you can latter add the other ones.
4 - If you have multiple NICs, disable all except the one, review DNS settings and try again, doing this will help you to isolate the root cause of the problem, and if success, review the configurations on these NICs (FW, IPAddress, Routes, etc...).
5 - Reboot the server and check if the server correctly register his DNS IP on your DNS servers.

Hum... Okay ENICKB, but and if I'm in a Windows 2008 R2 Core Edition?
If you're in a Core Edition you need to change the registry accordantly
Register this connection's addresses in DNS is located at:
HKEY_LOCAL_MACHINE\SYSTEM\CurrentControlSet\services\Tcpip\Parameters\Interfaces\{Interface GUID}\ RegistrationEnabled
and change the value from "0" to "1".

Note: Your {Interface GUID} will differ from those in the picture. Additionally you may need to configure this setting in one or more NICs.
Append these DNS suffixes (in order)":
HKEY_LOCAL_MACHINE\SYSTEM\CurrentControlSet\services\Tcpip\Parameters\SearchList

Additional note, when using the cluster wizard to add nodes of the future cluster try adding them using the FQDN of the servers, but remember, even if you add the NetBIOS Name of these servers, when you press enter they should be changed from NetBIOS format to FQDN.
Hopefully this will help you with your cluster creation successfully.
Monday, September 28, 2009
SCVMM 2008 R2 KB 971677
KB 971677 discusses an issue when a Hyper-V differencing disk that you create in Windows Server 2008 R2 cannot be used in Windows Server 2008.
Note: you need to click in "request hotfix" on top of KB page to request the hotfix for this specific error.
A server error occurred while you try to import the virtual machine. Failed to import the virtual machine from import directory ''. Failed to add device 'Microsoft Virtual Hard Disk'. Cannot open attachment '\Filename.vhd'. Error: 'The file or directory is corrupted and unreadable.'Cannot get information for attachment '\Filename.vhd'.
Note: you need to click in "request hotfix" on top of KB page to request the hotfix for this specific error.
A server error occurred while you try to import the virtual machine. Failed to import the virtual machine from import directory '
SCVMM 2008 R2 & Read Only Domain Controller
Although it is not a best practice, some people insist in having SCVMM hosted in RODCs. Have a look at some issues that you might encounter when doing this.
From SCVMM Team Blog
Using a Read Only Domain Controller as a Host in SCVMM 2008 and R2
A Read Only Domain Controller (RODC) can only be used as a Host if it was already a Host prior to being promoted. If a RODC needs to be used as a Host and was not previously managed by SCVMM, it will have to be demoted to a member server and made a managed Host prior to promotion back to RODC.
IMPORTANT: Although a Read Only Domain Controller can be used as Host in SCVMM, this is not the recommended usage of a Read Only Domain Controller.
KB975113 discusses an issue where a read only domain controller (RODC) can only be used as a Host if it was already a Host prior to being promoted. The link and title is below.
From SCVMM Team Blog
Using a Read Only Domain Controller as a Host in SCVMM 2008 and R2
A Read Only Domain Controller (RODC) can only be used as a Host if it was already a Host prior to being promoted. If a RODC needs to be used as a Host and was not previously managed by SCVMM, it will have to be demoted to a member server and made a managed Host prior to promotion back to RODC.
IMPORTANT: Although a Read Only Domain Controller can be used as Host in SCVMM, this is not the recommended usage of a Read Only Domain Controller.
KB975113 discusses an issue where a read only domain controller (RODC) can only be used as a Host if it was already a Host prior to being promoted. The link and title is below.
SCVMM 2008 R2 KB 974869
KB974869 discusses some issues that might occur if the SCVMM 2008 agents from the original version of Virtual Machine Manager 2008 remain after you upgrade to SCVMM 2008 R2.
Solution:
Manually upgrade all remaining agents to Virtual Machine Manager 2008 R2.
Warning (2927)A Hardware Management error has occurred trying to contact server. (Unknown error (0x80338041))
Error 0x80338041: The SOAP XML in the message does not match the corresponding XML schema definition. Change the XML and retry.
Error (2927)A Hardware Management error has occurred trying to contact server. (Unknown error (0x80338001))
Error 0x80338001: The WS-Management service cannot process the request. The WS-Addressing action URI is invalid. Check the documentation for information on how to construct an action URI.
Read more at:
KB974869 - You receive a warning 2927 and an unknown error when you create a virtual machine from a VHD file after you upgrade to System Center Virtual Machine Manager 2008 R2
Solution:
Manually upgrade all remaining agents to Virtual Machine Manager 2008 R2.
Warning (2927)A Hardware Management error has occurred trying to contact server
Error 0x80338041: The SOAP XML in the message does not match the corresponding XML schema definition. Change the XML and retry.
Error (2927)A Hardware Management error has occurred trying to contact server
Error 0x80338001: The WS-Management service cannot process the request. The WS-Addressing action URI is invalid. Check the documentation for information on how to construct an action URI.
Read more at:
KB974869 - You receive a warning 2927 and an unknown error when you create a virtual machine from a VHD file after you upgrade to System Center Virtual Machine Manager 2008 R2
SCVMM 2008 R2 KB 975426
KB975426 - Virtual machines cannot migrate from a Windows Server 2008 stand-alone server to a Windows Server 2008 cluster after you upgrade to System Center Virtual Machine Manager 2008 R2
This new KB discusses an issue where SAN migration may fail with error 1600 after upgrading to to System Center Virtual Machine Manager 2008 R2.
Error (1600)
VMM is unable to process one or more of the provided cmdlet parameters.
Recommended Action
Type Get-Help NO_PARAM -full to view a list of defined parameters and complete descriptions. Then try the operation again.
This new KB discusses an issue where SAN migration may fail with error 1600 after upgrading to to System Center Virtual Machine Manager 2008 R2.
Error (1600)
VMM is unable to process one or more of the provided cmdlet parameters.
Recommended Action
Type Get-Help NO_PARAM -full to view a list of defined parameters and complete descriptions. Then try the operation again.
Monday, September 21, 2009
Windows 2008 R2 Blue Screen in HP Servers
Today I was told about a possible problem when enabling Hyper-V Role on some HP Server models with Windows 2008 R2 installed, appears that the problem is well known in HP internal documents.
The solution:
So far sounds that disabling the disabling Intel Core C3 State option in the BIOS solves the problem.
After little Google search I found this in Minasi Forum
If you’ve this problem, please let me know if that solves your problem.
I already upgrade most of my environment to R2 version of Hyper-V including SCVMM 2008 R2. I waited for the supported version of HP firmware “ver. 8.60”/software/Drivers “ver.8.30” for HP DL380G5 servers, you can find them here, after applying the new firmware and drivers everything worked fine.
The solution:
So far sounds that disabling the disabling Intel Core C3 State option in the BIOS solves the problem.
After little Google search I found this in Minasi Forum
If you’ve this problem, please let me know if that solves your problem.
I already upgrade most of my environment to R2 version of Hyper-V including SCVMM 2008 R2. I waited for the supported version of HP firmware “ver. 8.60”/software/Drivers “ver.8.30” for HP DL380G5 servers, you can find them here, after applying the new firmware and drivers everything worked fine.
Monday, September 14, 2009
SCVMM 2008 R2 available for download at TechNet subscribers
Finally here!
Since this announcement that I’ve been waiting to have System Center Virtual Machine Manager 2008 R2 at TechNet...
For all of you that were waiting for that day the good news arrived... we don’t need to wait anymore, the bits are available at TechNet subscriber download area. Assuming a medium/fast internet access you should have no “Time” problems to download the 3,395.68 (MB) of the ISO for the x64 Bit version of System Center Virtual Machine Manager 2008 R2, if your internet access is slow or if you’re at some place were internet access is not very reliable, remember that you always have the download manager from TechNet that allows you to pause and resume the download whenever necessary.
SCVMM 2008 R2 new features available in my previous post here
If you don’t have a TechNet subscription you still have the evaluation download at Download Center site
But WAIT!!!! There’s more...
Don´t forget to check the new features, upgrade tips, etc.. Check my previous post at:
Useful Virtualization Documentation for MS R2 Products
Last week Microsoft released KB KB974869. According with them after upgrading to Microsoft System Center Virtual Machine Manager 2008 R2, when you try to create a new virtual machine from a VHD file that is stored in either a CSV file or in available storage you may receive Warning 2927 or error 0x80338041:
KB974869 - You receive a warning 2927 and an unknown error when you create a virtual machine from a VHD file after you upgrade to System Center Virtual Machine Manager 2008 R2.
Have Fun!!!
Since this announcement that I’ve been waiting to have System Center Virtual Machine Manager 2008 R2 at TechNet...
For all of you that were waiting for that day the good news arrived... we don’t need to wait anymore, the bits are available at TechNet subscriber download area. Assuming a medium/fast internet access you should have no “Time” problems to download the 3,395.68 (MB) of the ISO for the x64 Bit version of System Center Virtual Machine Manager 2008 R2, if your internet access is slow or if you’re at some place were internet access is not very reliable, remember that you always have the download manager from TechNet that allows you to pause and resume the download whenever necessary.
SCVMM 2008 R2 new features available in my previous post here
If you don’t have a TechNet subscription you still have the evaluation download at Download Center site
But WAIT!!!! There’s more...
Don´t forget to check the new features, upgrade tips, etc.. Check my previous post at:
Useful Virtualization Documentation for MS R2 Products
Last week Microsoft released KB KB974869. According with them after upgrading to Microsoft System Center Virtual Machine Manager 2008 R2, when you try to create a new virtual machine from a VHD file that is stored in either a CSV file or in available storage you may receive Warning 2927 or error 0x80338041:
KB974869 - You receive a warning 2927 and an unknown error when you create a virtual machine from a VHD file after you upgrade to System Center Virtual Machine Manager 2008 R2.
Have Fun!!!
Tuesday, July 14, 2009
How to Disable IPv6 in Windows 2008 Full and Core editions
IPv6 is by default enabled in Windows Vista and Windows 2008. Many people argue that they’re having issues because they’re not using it and some apps may fail to work correctly due the fact of miss IPv6 configuration address or because the Apps don't understand IPv6. Before disabling IPv6 be aware that some new features on windows will require IPv6 to work, so be aware of that before starting to make changes to your servers or workstations.
So how to disable IPv6?
Simple, first disable IPv6 under your NIC properties (if you've multiple interfaces do it for each one)

To completely disable IPv6 go to the following registry (Remember to ALWAYS backup the registry keys that you're changing before changing the):
HKEY_LOCAL_MACHINE\SYSTEM\CurrentControlSet\Services\tcpip6\Parameters\
Create the following registry value (DWORD type): DisabledComponents
Note that “DisabledComponents” is case sensitive and should be typed exactly like that.
DisabledComponents is set to 0 by default. To disable IPv6 support on all interfaces, set the value to FFFFFFFF. The registry entry will look like below:

Restart the computer for the changes to the DisabledComponents registry value to take effect.
DONE!!!!
Okay, fine, but... and if I have a Windows Core version?!!!!
In Windows core edition we don’t have GUI to disable the IPv6 under NIC properties, so option is to directly edit the registry.
To start lets try to disable IPv6 only in one adapter as if we were in a FULL installation mode :)
First let's identify the adapter to be disabled, to do that type:
WMIC NICCONFIG WHERE IPENABLED=TRUE GET Description,SettingID,IPADDRESS /FORMAT:LIST
Identify the NICs that you want to disable IPv6.

In this scenario I want to disable the interface that has the ipv4 "1.1.1.3" and IPv6 "fe80::9d2d:fc06:8abd:44ef"
The interface SettingID is "{93145725-C49B-4A42-87F0-415B6335D211}"
(Remember, always backup your registry before making any changes).
Then type regedit to open registry editor and navigate to HKEY_LOCAL_MACHINE\SYSTEM\CurrentControlSet\Services\Tcpip6\Linkage
Open the “Bind”, “Export” and “Route” String Values and remove the Adapter SettingID that corresponds to the listed NIC that you want to unbind IPv6.
(in this scenario is the Adapter ID {93145725-C49B-4A42-87F0-415B6335D211})

Then navigate to HKEY_LOCAL_MACHINE\SYSTEM\CurrentControlSet\Control\Class\{4D36E972-E325-11CE-BFC1-08002BE10318}
Now you need to identify where youre NIC is at... To do that select the subkeys "0000", "0001", "0002" and so on untill you get desired NIC, to identify the NIC, you need to know the Description and SettingID that we get from WMIC cmd, then compare the values, if they match you're on the right place. In this scenario the Description is "HP NC364T PCIe Quad Port Gigabit Server Adapter" and the SettingID is "93145725-C49B-4A42-87F0-415B6335D211"
As you see the correspondent value is "0005"

The next Step is to unbind the Tcpip6 from the adapter, to do that open the HKEY_LOCAL_MACHINE\SYSTEM\CurrentControlSet\Control\Class\{4D36E972-E325-11CE-BFC1-08002BE10318}\xxxx\Linkage\UpperBind key and remove the entry for Tcpip6.

After the change:

Reboot the server.
After the reboot, type from cmdline:
WMIC NICCONFIG WHERE IPENABLED=TRUE GET Description,SettingID,IPADDRESS /FORMAT:LIST
Now, as you can see you no longer have the IPv6 bound the that adapter.

DONE!!!!
Q&A
Q: And if I want to do this for more adapters?
A: Repeat the same process for each adapter that you want to disable IPv6.
Q: Can I use the “DisabledComponents” reg key as I did in Windows FULL edition?
A: Yes you can. In that Scenario you need to remove all the values from “Bind”, “Export” and “Route” that are under HKEY_LOCAL_MACHINE\SYSTEM\CurrentControlSet\Services\Tcpip6\Linkage, then, configure the “DisabledComponents” reg key as you did in Windows FULL edition under HKEY_LOCAL_MACHINE\SYSTEM\CurrentControlSet\Services\tcpip6\Parameters\ .
(No need to disable Tcpip6 under HKEY_LOCAL_MACHINE\SYSTEM\CurrentControlSet\Control\Class\{4D36E972-E325-11CE-BFC1-08002BE10318}\xxxx\Linkage\UpperBind )
You must restart the computer for the changes to the DisabledComponents registry value to take effect.
Q: Do you know any issue when using "DisabledComponents" in Windows Core?
A: Yes. after you configure the DisabledComponents in windows Core and reboot, if you use Computer Management to remotely connect to that server Core you may see a warning for the 6TO4 Adapter - "This device cannot start. (Code 10)".

To solve this problem you need to disable the 6TO4 adapter (since that you're not using it) using the Netsh cmdline:
IMPORTANT:
You must do this before you configure the DisabledComponents reg key!!!
The correct order is:
- Clear the DisabledComponents reg key (if it is configured).
- Reboot the server.
- From cmdline type: <netsh in 6to4 set state disable>

- Configure the DisabledComponents reg key
- Reboot the server.
- Use the Computermanagement to remotely connect to the server core and confirm that everything is ok now.

IF this doesn't solve your problem you've another option:
(Warning: the next procedure is to uninstall the 6TO4 adapter from your system, you may have problems by doing that, and I rather disable than removing it, proceed at your own risk)
Okay let's assume that the previous procedure didn't solved the 6TO4 adapter warning, the additional option is to uninstall it from the system.
- In Windows 2008 FULL edition, you need to open the device manager, then right click in the adapter and choose the option "uninstall". Then reboot the server and the error should be fixed.
- How do I uninstall this device in Windows Core Edition? Simple, from command line type:
netcfg -u *6to4mp
Then reboot the server and the error should be fixed.
Q: After I fix the 6TO4 adapter warning, I decided that I want that adapter back but I can't ...
A: You need to remove the setting for "DisabledComponents" and remove all the values from “Bind”, “Export” and “Route” that are under HKEY_LOCAL_MACHINE\SYSTEM\CurrentControlSet\Services\Tcpip6\Linkage
Then
If you disabled the adapter: you need to enable it again using the following cmd:
Netsh i 6TO4 set state enable, after that Reboot the server
If you uninstalled the adapter: Just reboot the server.
As final note, you may want to reconfigure your Hosts File and disable the Localhost for IPv6 by placing a "#" before ::1 Localhost, then save the file...

Additional Information:
From: http://technet.microsoft.com/en-us/library/bb878057.aspx
The DisabledComponents registry value is a bit mask that controls the following series of flags, starting with the low order bit (Bit 0):
Bit 0 Set to 1 to disable all IPv6 tunnel interfaces, including ISATAP, 6to4, and Teredo tunnels. Default value is 0.
Bit 1 Set to 1 to disable all 6to4-based interfaces. Default value is 0.
Bit 2 Set to 1 to disable all ISATAP-based interfaces. Default value is 0.
Bit 3 Set to 1 to disable all Teredo-based interfaces. Default value is 0.
Bit 4 Set to 1 to disable IPv6 over all non-tunnel interfaces, including LAN interfaces and Point-to-Point Protocol (PPP)-based interfaces. Default value is 0.
Bit 5 Set to 1 to modify the default prefix policy table to prefer IPv4 to IPv6 when attempting connections. Default value is 0.
To determine the value of DisabledComponents for a specific set of bits, construct a binary number consisting of the bits and their values in their correct position and convert the resulting number to hexadecimal. For example, if you want to disable 6to4 interfaces, disable Teredo interfaces, and prefer IPv4 to IPv6, you would construct the following binary number: 101010. When converted to hexadecimal, the value of DisabledComponents is 0x2A.
The following table lists some common configuration combinations and the corresponding value of DisabledComponents.
Configuration DisabledComponents value
Disable all tunnel interfaces 0x1
Disable 6to4 0x2
Disable ISATAP 0x4
Disable Teredo 0x8
Disable Teredo and 6to4 0xA
Disable all LAN and PPP interfaces 0x10
Disable all LAN, PPP, and tunnel interfaces 0x11
Prefer IPv4 over IPv6 0x20
Disable IPv6 over all interfaces and prefer IPv4 to IPv6 0xFF
Have Fun :P
So how to disable IPv6?
Simple, first disable IPv6 under your NIC properties (if you've multiple interfaces do it for each one)

To completely disable IPv6 go to the following registry (Remember to ALWAYS backup the registry keys that you're changing before changing the):
HKEY_LOCAL_MACHINE\SYSTEM\CurrentControlSet\Services\tcpip6\Parameters\
Create the following registry value (DWORD type): DisabledComponents
Note that “DisabledComponents” is case sensitive and should be typed exactly like that.
DisabledComponents is set to 0 by default. To disable IPv6 support on all interfaces, set the value to FFFFFFFF. The registry entry will look like below:

Restart the computer for the changes to the DisabledComponents registry value to take effect.
DONE!!!!
Okay, fine, but... and if I have a Windows Core version?!!!!
In Windows core edition we don’t have GUI to disable the IPv6 under NIC properties, so option is to directly edit the registry.
To start lets try to disable IPv6 only in one adapter as if we were in a FULL installation mode :)
First let's identify the adapter to be disabled, to do that type:
WMIC NICCONFIG WHERE IPENABLED=TRUE GET Description,SettingID,IPADDRESS /FORMAT:LIST
Identify the NICs that you want to disable IPv6.

In this scenario I want to disable the interface that has the ipv4 "1.1.1.3" and IPv6 "fe80::9d2d:fc06:8abd:44ef"
The interface SettingID is "{93145725-C49B-4A42-87F0-415B6335D211}"
(Remember, always backup your registry before making any changes).
Then type regedit to open registry editor and navigate to HKEY_LOCAL_MACHINE\SYSTEM\CurrentControlSet\Services\Tcpip6\Linkage
Open the “Bind”, “Export” and “Route” String Values and remove the Adapter SettingID that corresponds to the listed NIC that you want to unbind IPv6.
(in this scenario is the Adapter ID {93145725-C49B-4A42-87F0-415B6335D211})

Then navigate to HKEY_LOCAL_MACHINE\SYSTEM\CurrentControlSet\Control\Class\{4D36E972-E325-11CE-BFC1-08002BE10318}
Now you need to identify where youre NIC is at... To do that select the subkeys "0000", "0001", "0002" and so on untill you get desired NIC, to identify the NIC, you need to know the Description and SettingID that we get from WMIC cmd, then compare the values, if they match you're on the right place. In this scenario the Description is "HP NC364T PCIe Quad Port Gigabit Server Adapter" and the SettingID is "93145725-C49B-4A42-87F0-415B6335D211"
As you see the correspondent value is "0005"

The next Step is to unbind the Tcpip6 from the adapter, to do that open the HKEY_LOCAL_MACHINE\SYSTEM\CurrentControlSet\Control\Class\{4D36E972-E325-11CE-BFC1-08002BE10318}\xxxx\Linkage\UpperBind key and remove the entry for Tcpip6.

After the change:

Reboot the server.
After the reboot, type from cmdline:
WMIC NICCONFIG WHERE IPENABLED=TRUE GET Description,SettingID,IPADDRESS /FORMAT:LIST
Now, as you can see you no longer have the IPv6 bound the that adapter.

DONE!!!!
Q&A
Q: And if I want to do this for more adapters?
A: Repeat the same process for each adapter that you want to disable IPv6.
Q: Can I use the “DisabledComponents” reg key as I did in Windows FULL edition?
A: Yes you can. In that Scenario you need to remove all the values from “Bind”, “Export” and “Route” that are under HKEY_LOCAL_MACHINE\SYSTEM\CurrentControlSet\Services\Tcpip6\Linkage, then, configure the “DisabledComponents” reg key as you did in Windows FULL edition under HKEY_LOCAL_MACHINE\SYSTEM\CurrentControlSet\Services\tcpip6\Parameters\ .
(No need to disable Tcpip6 under HKEY_LOCAL_MACHINE\SYSTEM\CurrentControlSet\Control\Class\{4D36E972-E325-11CE-BFC1-08002BE10318}\xxxx\Linkage\UpperBind )
You must restart the computer for the changes to the DisabledComponents registry value to take effect.
Q: Do you know any issue when using "DisabledComponents" in Windows Core?
A: Yes. after you configure the DisabledComponents in windows Core and reboot, if you use Computer Management to remotely connect to that server Core you may see a warning for the 6TO4 Adapter - "This device cannot start. (Code 10)".

To solve this problem you need to disable the 6TO4 adapter (since that you're not using it) using the Netsh cmdline:
IMPORTANT:
You must do this before you configure the DisabledComponents reg key!!!
The correct order is:
- Clear the DisabledComponents reg key (if it is configured).
- Reboot the server.
- From cmdline type: <netsh in 6to4 set state disable>

- Configure the DisabledComponents reg key
- Reboot the server.
- Use the Computermanagement to remotely connect to the server core and confirm that everything is ok now.

IF this doesn't solve your problem you've another option:
(Warning: the next procedure is to uninstall the 6TO4 adapter from your system, you may have problems by doing that, and I rather disable than removing it, proceed at your own risk)
Okay let's assume that the previous procedure didn't solved the 6TO4 adapter warning, the additional option is to uninstall it from the system.
- In Windows 2008 FULL edition, you need to open the device manager, then right click in the adapter and choose the option "uninstall". Then reboot the server and the error should be fixed.
- How do I uninstall this device in Windows Core Edition? Simple, from command line type:
netcfg -u *6to4mp
Then reboot the server and the error should be fixed.
Q: After I fix the 6TO4 adapter warning, I decided that I want that adapter back but I can't ...
A: You need to remove the setting for "DisabledComponents" and remove all the values from “Bind”, “Export” and “Route” that are under HKEY_LOCAL_MACHINE\SYSTEM\CurrentControlSet\Services\Tcpip6\Linkage
Then
If you disabled the adapter: you need to enable it again using the following cmd:
Netsh i 6TO4 set state enable, after that Reboot the server
If you uninstalled the adapter: Just reboot the server.
As final note, you may want to reconfigure your Hosts File and disable the Localhost for IPv6 by placing a "#" before ::1 Localhost, then save the file...

Additional Information:
From: http://technet.microsoft.com/en-us/library/bb878057.aspx
The DisabledComponents registry value is a bit mask that controls the following series of flags, starting with the low order bit (Bit 0):
Bit 0 Set to 1 to disable all IPv6 tunnel interfaces, including ISATAP, 6to4, and Teredo tunnels. Default value is 0.
Bit 1 Set to 1 to disable all 6to4-based interfaces. Default value is 0.
Bit 2 Set to 1 to disable all ISATAP-based interfaces. Default value is 0.
Bit 3 Set to 1 to disable all Teredo-based interfaces. Default value is 0.
Bit 4 Set to 1 to disable IPv6 over all non-tunnel interfaces, including LAN interfaces and Point-to-Point Protocol (PPP)-based interfaces. Default value is 0.
Bit 5 Set to 1 to modify the default prefix policy table to prefer IPv4 to IPv6 when attempting connections. Default value is 0.
To determine the value of DisabledComponents for a specific set of bits, construct a binary number consisting of the bits and their values in their correct position and convert the resulting number to hexadecimal. For example, if you want to disable 6to4 interfaces, disable Teredo interfaces, and prefer IPv4 to IPv6, you would construct the following binary number: 101010. When converted to hexadecimal, the value of DisabledComponents is 0x2A.
The following table lists some common configuration combinations and the corresponding value of DisabledComponents.
Configuration DisabledComponents value
Disable all tunnel interfaces 0x1
Disable 6to4 0x2
Disable ISATAP 0x4
Disable Teredo 0x8
Disable Teredo and 6to4 0xA
Disable all LAN and PPP interfaces 0x10
Disable all LAN, PPP, and tunnel interfaces 0x11
Prefer IPv4 over IPv6 0x20
Disable IPv6 over all interfaces and prefer IPv4 to IPv6 0xFF
Have Fun :P
Wednesday, June 24, 2009
Hyper-V & SCVMM Error: 12700 / (0x8005) Migration Failed
Today I was testing the migration between my Hyper-V server clusters and the non-clusters Hyper-V.
The first step was to migrate from the cluster to a non-cluster server using SCVMM. The process went very well and the machine was successfully migrated between both hosts...
Then I decide to do the other way around... When the process was at 49% it crashes with the following error:
Error (12700)
VMM cannot complete the Hyper-V operation on the hv01srv.domain.tld server because of the error:
Import failed because the virtual machine must have a new identifier. Select a new identifier and try the import again.
(Unknown error (0x8005))
Recommended Action
Resolve the issue in Hyper-V and then try the operation again.
Additionally you get the EVENTID 18070 on the host where you perform the operation:
Log Name: Microsoft-Windows-Hyper-V-VMMS-Admin
Source: Microsoft-Windows-Hyper-V-VMMS
Date:
Event ID: 18070
Task Category: None
Level: Error
Keywords:
User: SYSTEM
Computer: hv01srv.domain.tld
Description: Import failed because the virtual machine must have a new identifier. Select a new identifier and try the import again.

GREAT!!!!
Before telling you how to solve this, let me tell you that you can always rollback the migration process by right-clicking in the VM and choose repair and then select the Undo option and press OK. So don't panic!!!
The first step was to migrate from the cluster to a non-cluster server using SCVMM. The process went very well and the machine was successfully migrated between both hosts...
Then I decide to do the other way around... When the process was at 49% it crashes with the following error:
Error (12700)
VMM cannot complete the Hyper-V operation on the hv01srv.domain.tld server because of the error:
Import failed because the virtual machine must have a new identifier. Select a new identifier and try the import again.
(Unknown error (0x8005))
Recommended Action
Resolve the issue in Hyper-V and then try the operation again.
Additionally you get the EVENTID 18070 on the host where you perform the operation:
Log Name: Microsoft-Windows-Hyper-V-VMMS-Admin
Source: Microsoft-Windows-Hyper-V-VMMS
Date:
Event ID: 18070
Task Category: None
Level: Error
Keywords:
User: SYSTEM
Computer: hv01srv.domain.tld
Description: Import failed because the virtual machine must have a new identifier. Select a new identifier and try the import again.

GREAT!!!!
Before telling you how to solve this, let me tell you that you can always rollback the migration process by right-clicking in the VM and choose repair and then select the Undo option and press OK. So don't panic!!!

This problem occurred because when I did the migration from the HV Cluster to the Non-HV server, the file {GUIG}.xml) that identifies the VM was not deleted from cluster node. The file is in the "C:\ProgramData\Microsoft\Windows\Hyper-V\Virtual Machines\{GUIG}.xml"
Note: By default the ProgramData Folder is hidden, to view this folder you must activate the option "Show hidden folders and files" under folders option menu.
Solution:
To solve this error, delete the duplicated file in the destination server (if you're in a cluster configuration you may need to check all the nodes before retry the migration).
How do I know the file to delete?
Simple, on the source server open the:
"C:\ProgramData\Microsoft\Windows\Hyper-V\Virtual Machines\"
Do the same for the destination server and open:
"C:\ProgramData\Microsoft\Windows\Hyper-V\Virtual Machines\"
Now, find the file that is duplicated in both sides:

After identification of the given xml file, on the destination server, delete the duplicated file and retry the migration again and you should be able to succeed this time.

Finishing the migration process at 99% after the change...

I ran search for a fix or explanation for this behavior, but I did not find anything that explains this, I'll try to update this post latter with a possible MS fix or explanation.
:)
Hyper-V & SCVMM Error: 0x80070057 Import / Export Virtual Machine
Today I tried to import a VM using the Hyper-V mmc console that I exported some time ago to later use. When I tried to do that I got the error:
Hyper-V Manager
A server error occured while attempting to import the virtual machine.
Failed to import the virtual nachine from directory %directorypath%.
Error: One or more arguments are invalid (0x80070057).
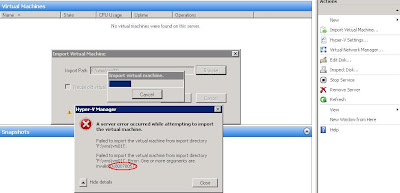
The solution to fix this error is to clear the ScopeOfResidence value and you should be able to import the same machine again with no errors.
To do that, go to the the VM path folder, then open the {GUID}.exp file (generally under "drive:\pathtovm\vmname\Virtual Machines\"). Open the .exp file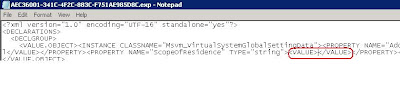
In this case clear the value for 9c62b993-f3e9-44fc-80e1-f798f8bbe17f :

Save the file and import the machine again.
Hyper-V Manager
A server error occured while attempting to import the virtual machine.
Failed to import the virtual nachine from directory %directorypath%.
Error: One or more arguments are invalid (0x80070057).

The solution to fix this error is to clear the ScopeOfResidence value and you should be able to import the same machine again with no errors.
To do that, go to the the VM path folder, then open the {GUID}.exp file (generally under "drive:\pathtovm\vmname\Virtual Machines\"). Open the .exp file

In this case clear the value for 9c62b993-f3e9-44fc-80e1-f798f8bbe17f :

Save the file and import the machine again.

DONE!
TIP: Suppose that you sysprep a VM and exported that VM to latter use. Now you duplicated that exported VM into 10 VMs (VM01, 02, 03 ...). When you try to import that VM you get this error, what to do?
2 options:
You can correct the ScopeOfResidence value for the original VM (the exported VM) and then duplicate that VM to 10 VMs as you did.
Or
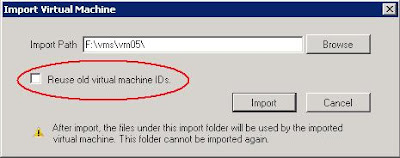
You can correct the ScopeOfResidence value on the first duplicated VM (VM01) and then copy that *.exp file to all other VMs (VM02, 03 ...). Will this cause trouble with duplicated *.exp file names? No as long as you don't use the option "Reuse old virtual machine IDs", because when you import that VM, Hyper-V will change the value of those files to a different {GUID}.xml file.

After solving this one, I went to internet and did a search for a MS KB about this problem, and I found additional information under KB968968 that states this problem for Hyper-V and System Center Virtual Machine Manager (SCVMM) scenarios.
Additionaly they provide a script to use on a Hyper-V server before you import a virtual machine to the Hyper-V server
*****************************************************
Option Explicit
Dim WMIService
Dim VMList
Dim VM
Dim VMSystemGlobalSettingData
Dim VMManagementService
Dim Result
'Get instance of 'virtualization' WMI service on the local computer
Set WMIService = GetObject("winmgmts:\\.\root\virtualization")
'Get a VMManagementService object
Set VMManagementService = WMIService.ExecQuery("SELECT * FROM Msvm_VirtualSystemManagementService").ItemIndex(0)
'Get all the MSVM_ComputerSystem object
Set VMList = WMIService.ExecQuery("SELECT * FROM Msvm_ComputerSystem")
For Each VM In VMList
if VM.Caption = "Virtual Machine" then
Set VMSystemGlobalSettingData = (VM.Associators_("MSVM_ElementSettingData", "Msvm_VirtualSystemGlobalSettingData")).ItemIndex(0)
VMSystemGlobalSettingData.ScopeOfResidence = ""
Result = VMManagementService.ModifyVirtualSystem(VM.Path_.Path, VMSystemGlobalSettingData.GetText_(1))
end if
Next
*****************************************************
Subscribe to:
Posts (Atom)


